
15 Christmas Rock Painting Ideas Using Dot Art
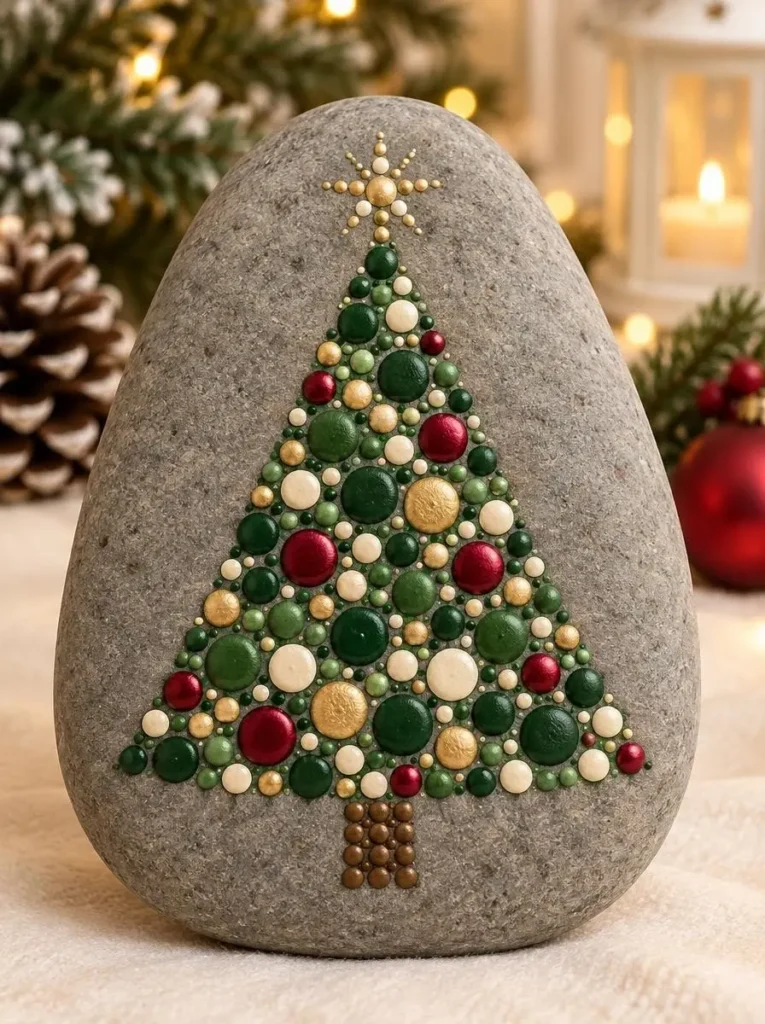
Looking for Christmas rock painting ideas that are colorful, festive, and fun to try? Dot art is a wonderful way to decorate stones for the holiday season. Instead of painting every detail with a brush, you can use dots of different sizes to create Christmas trees, snowflakes, ornaments, flowers, and beautiful patterns.
You don’t need to be an experienced artist to get started. Simple shapes, bright acrylic colors, and repeated dots can turn an ordinary stone into a cheerful Christmas decoration.
If you enjoy dot painting but aren’t sure how to plan a design, explore the Dot Art for Beginners guide. It includes printable templates and guidance for getting started without drawing skills.
These 15 Christmas dot art designs include easy ideas for beginners as well as more detailed patterns for anyone who enjoys experimenting with color.
1. Christmas Tree Dot Art
A Christmas tree is one of the easiest festive designs to adapt to dot painting.
Start with a dark green, blue, or red background. Create a simple tree shape using rows of green dots, making each row slightly shorter as you move toward the top. Add colorful dots for ornaments and finish with a yellow or gold star.
Beginner tip: Use larger dots near the bottom and smaller dots near the top to help the tree look balanced.
2. Red and Gold Christmas Mandala
For a more decorative design, combine red, gold, white, and dark green dots in a circular pattern.
Begin with one large dot in the center of the stone. Add rings of smaller dots around it, alternating colors and dot sizes. A few gold accents can make the design look especially festive.
This idea works well on smooth, round stones and is perfect for anyone who likes symmetrical patterns.
3. White Snowflake on a Blue Stone
A deep blue or navy background makes white snowflakes stand out beautifully.
Create a simple snowflake using a few short lines or a central arrangement of dots. Add smaller dots around the branches to suggest falling snow. Silver or pale blue accents can add variety without making the design too complicated.
You can make one large snowflake in the center or cover the stone with several smaller ones.
4. Colorful Christmas Ornament
Turn a round stone into a Christmas bauble using red, turquoise, purple, or bright pink paint.
Paint a large circle or oval, then decorate it with rows of white and gold dots. Add a small cap at the top and a dotted border around the edge.
Try repeating the same design in different colors to create a matching set of Christmas decorations.
5. Festive Dot Art Wreath
A Christmas wreath can be created with a circle of green dots.
Use two or three shades of green to give the wreath more depth. Add small red dots for berries, white dots for a snowy effect, and a bright bow at the top.
The design can be simple and bold or more detailed, with several rings of dots around the center.
6. Candy Cane Inspired Dot Pattern
Red and white are a classic Christmas combination.
On a light-colored stone, arrange red and white dots in curved rows to suggest the stripes of a candy cane. You can also create a dotted border around a simple candy cane shape.
For a more decorative version, add tiny green dots and a few gold accents.
7. Christmas Lights in Bright Colors
If you prefer cheerful, colorful designs, try a string of Christmas lights.
Paint a curved dark line across the stone, then add oval or round dots in bright red, yellow, blue, purple, and green. A tiny white highlight on each colored bulb can make the lights look more dimensional.
This is a good way to use a bright palette and create a playful design without covering the entire stone in a complicated pattern.
8. A Golden Star on a Dark Background
A gold star against a dark blue, purple, or black background creates a striking Christmas design.
Place a larger gold or yellow star in the center. Surround it with small white and gold dots arranged in circles or radiating lines.
You can keep the star simple or use dot sizes that gradually decrease toward the edges.
9. Snowy Night Sky
Create a winter night scene with a dark blue background and dots in white, silver, and pale blue.
Use a mixture of large and small dots to represent falling snow and distant stars. A simple row of dark evergreen silhouettes along the bottom can complete the scene.
This design looks particularly effective when the background is dark and the dots are bright.
10. Dotted Christmas Flower
Flowers can work beautifully in Christmas color palettes.
Create a flower with red or white petal dots around a contrasting center. Add green dots for leaves and smaller dots around the edges to fill the remaining space.
For a more decorative look, layer smaller dots over the larger petals after the first layer has dried.
11. Peppermint Inspired Dot Circles
Use red and white dots to create a circular pattern inspired by peppermint candy.
Start in the center and work outward, alternating the two colors in curved rows or concentric rings. You can keep the pattern symmetrical or experiment with a more playful arrangement.
A white or pale pink background will make the red dots stand out, while a dark background creates a more dramatic effect.
12. Colorful Dotted Christmas Tree
For a brighter alternative to traditional green and red, use turquoise, coral, yellow, purple, and pink.
Arrange dots into a simple triangular tree shape. Add larger dots for ornaments and smaller dots between them to fill the design.
This cheerful version is ideal if you enjoy bold colors and want a Christmas decoration that looks different from traditional holiday designs.
13. Christmas Gift Inspired Stone
Create a gift-inspired design using a bright background and a contrasting dotted ribbon.
Paint a simple vertical and horizontal band across the stone. Add small dots along the bands and a dotted bow at the top.
You can make several stones in different colors and use them as little holiday decorations or handmade gifts.
14. Dotted Holly Leaves and Berries
Holly is another classic Christmas motif that works well with dot art.
Use green dots to create two or three leaf shapes. Add clusters of bright red berries in the center and small white dots around the design.
You can paint the motif in the middle of a stone or use it as a decorative border around the edge.
15. A Colorful Christmas Dot Mandala
If you want to try a more detailed design, create a Christmas mandala using several rings of dots.
Choose a palette of red, green, turquoise, yellow, white, and purple. Begin with a central dot and work outward, keeping the spacing as even as possible.
Alternate large and small dots, repeat the same colors in different rings, and allow each layer to dry before adding dots on top.
You do not have to make every dot identical. A repeated pattern and a balanced color combination can make the design look cohesive.
What Do You Need for Christmas Dot Art?
You can start with a few basic supplies:
- Smooth stones or flat pebbles
- Acrylic paints in your favorite Christmas colors
- Dotting tools in several sizes
- A pencil for lightly marking the center, if needed
- A palette or other surface for small amounts of paint
- A suitable clear sealer, if you want additional protection
You don’t need a large collection of specialist tools. A few different dotting sizes will give you enough variety to create simple patterns and more detailed designs.
How to Prepare Stones for Dot Painting
Good preparation makes the painting process easier.
1. Choose a suitable stone. A relatively smooth surface is easier to decorate than a very rough or deeply textured one.
2. Clean the stone. Remove dirt and dust, then let it dry completely.
3. Add a base coat if desired. A solid background can help colorful dots stand out. Allow the paint to dry before adding the pattern.
4. Test your paint. The paint should form a rounded dot rather than spreading into a puddle or pulling into a peak. Test it on scrap material before painting your finished design.
5. Work in layers. Start with larger dots and add smaller details when the first layer is dry.
How to Make Neat Dots
The secret to attractive dot art is consistency.
Dip the tip of your dotting tool into the paint, touch it gently to the surface, and lift it straight up. Reload the tool when necessary so your dots remain similar in size.
Use a larger tool for the main pattern and smaller tools for the details. If you want to place dots in a circle, mark the center first and work outward gradually.
If a dot doesn’t turn out the way you expected, let it dry before deciding whether to cover or adjust it. Small imperfections are normal when you’re learning.
How to Protect Your Finished Christmas Stones
Let the paint dry completely before handling the finished design.
If you want to apply a clear sealer, choose one suitable for your paint and the intended use of the stone. Follow the product’s instructions and test it on a spare painted surface first, because some finishes can affect the appearance of the paint.
Decorative stones kept indoors generally have different protection needs from stones exposed to rain, frost, and changing outdoor conditions.
Can Beginners Make Christmas Dot Art?
Yes! Many Christmas designs can be simplified into basic shapes and repeated dots. Start with a Christmas tree, ornament, star, or simple dotted flower before attempting a more detailed mandala.
You don’t have to draw a complicated design freehand. Working with a simple outline or a placement guide can help you plan where the main dots should go.
If you enjoy dot painting but aren’t sure how to plan a design, explore the Dot Art for Beginners guide. It includes printable templates and guidance for getting started without drawing skills.
Final Thoughts
Christmas rock painting is a fun way to explore color and pattern while creating small holiday decorations. From bright Christmas trees to intricate dot mandalas, there are plenty of ways to adapt festive motifs to dot art.
Choose one design that appeals to you, gather a few paints, and start with simple dots. You can always add more detail as you become comfortable with the technique.